
Making the Star Charts
The star charts
This site uses star charts in the form of bitmap files wrapped around spheres to illustrate certain things or to point out stars. These charts are available for download for use in your own projects. An explanation of how they were created by the ThinkQuest team follows. Some experience with trigonometry and computer programming is helpful.
The renderer
The star charts were designed to be wrapped around a perfect sphere inside of the 3D renderer used heavily by the team. The most important requirement of the chart is that any star must appear as a circle once wrapped around the sphere. To accomplish this, the method that the renderer uses to wrap an image around a sphere must be understood.
The renderer uses a method called spherical mapping to wrap an image around a sphere. The following image is a test image used to illustrate how it does this.
 |
| Figure 1: The test image |
To wrap this image around the sphere evenly, the image must be stretched so that the vertical colored lines meet at the top and bottom of the sphere. To accomplish this, the renderer shrinks each pixel horizontally according to how high up on the sphere the pixel is. Figure 2 shows the previous picture stretched around the sphere.
 |
| Figure 2: The test image wrapped around a sphere from the side and top |
From this, we can see that the renderer stretches the image around the sphere in a counter-clockwise direction if we look at it from the top. The renderer does not stretch the pixels vertically if the image is exactly twice as wide is it is tall. This means that if you are at the center of the sphere and measure the angle each pixel takes up vertically, it will be 180o divided by the number of pixels high the image is. This is illustrated in the following image where there is 45o between each red line (not including the ones on the image itself) and the sphere is cut in half.
 |
| Figure 3: The sphere cut in half |
The reason the image must be twice as wide as it is tall is because from the top of the sphere to the bottom of the sphere is 180o (half of a circle), but all of the way around the sphere is 360o. Therefore the image must cover 360o in width but only half that in height.
At this point, it is useful to put the sphere into an imaginary 3D world. From now on, subscripts will be used to denote whether the coordinates refer to a pixel on the image or whether they refer to a point in the imaginary 3D world. The subscript "i" will mean image, "w" will mean the 3D world. For instance (xw,yw,zw) will refer to a point in the 3D world, (xi,yi) will refer to a pixel on the image that is wrapped around the sphere. For angles, Eo and Vo will refer to the angles in the polar coordinates of a point in the 3D world. Eo stands for equatorial and it is the angle on the xw,yw plane. Vo stands for vertical and is the angle between the line from the origin to the point's (xw,yw) coordinates and the line from the origin to the point's (xw,yw,zw) coordinates, in other words, the angle on the plane perpendicular to the (xw,yw) plane.
The sphere is centered at the origin and the xw, yw, and zw axes are defined in the image below where xw is blue, yw is yellow, and zw is green. The black line is the left and right edges of the image stretched around the sphere. The red disk is the plane made up of only the xw and yw axes, it also represents the "equator" of the sphere.
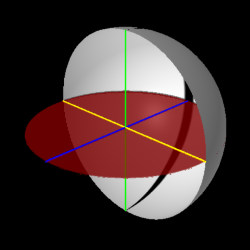 |
| Figure 4: The axes of the imaginary 3D world |
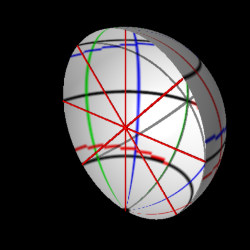
We can get the polar coordinates of any point in the 3D world (see figure 5) by first measuring the angle Eo the point's (xw,yw) coordinates make on the (xw,yw) plane (the red disk) and getting the distance of the line L (the pink line) it makes to the origin. We can then use the length of L to find the angle Vo between line L and line R, which is the line that goes directly to the point's (xw,yw,zw) coordinates. For instance we can take a point on the sphere which has the coordinates (x1w,y1w,z1w) and measure its polar coordinates on two planes. These lines are shown in the following figure. The red line (line R) goes directly to the point and has the length of the radius of the sphere, the pink line (line L) goes to the point's x1w,y1w coordinates only.
 |
| Figure 4: The axes of the imaginary 3D world |
We can measure the angles to this point by spliting the problem into the two planes shown below. The colors are the same.
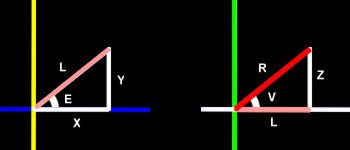 |
| Figure 4: Math on the two planes. |
Using the Pythegorean theorem we come up with these equations:
R2 = Z1w2 + L2
L2 = X1w2 + Y1w2
Above equations combined:
R2 = X1w2 + Y1w2
+ Z1w2
Using Sin, Cos, and Tan, we come up with these equations (*
means times):
E = ArcTan(Y1w / X1w)
V = ArcTan(Z 1w / L)
L = R * Cos(Vo)
X1w = L * Cos(Eo)
Y1w = L* Sin(Eo)
Z1w = R * Sin(Vo)
Now that we have these equations, we can convert from (xw,yw,zw) coordinates to angles or from angles to (xw,yw,zw) coordinates. We can also find the distance from the origin to any point.
Pixels on the sphere
Because of the way the renderer wraps the image around the sphere, the angle Vo to every pixel in a horizontal row of pixels is the same and the angle Eo to every pixel in a vertical row is the same. Also, there is always the same number of pixels in a row and the same number of pixels in a column. We can then find the polar coordinates for any pixel in the sphere with the following equations, Ih is the height of the image in pixels.
Vo = (180o / Ih) * (Ih /
2 - yi)
Eo = (180o / Ih) * xi
In each equation, (180o / Ih) is the angle each pixel takes up.
The computer references each pixel in an image by measuring from the top left of the image and going right and down. The coordinates for each pixel are always positive. Since we measure the position of stars on the celestial sphere from the equator up for positive values or down for negative values, the pixels in the image also must be measured from the middle and the polarity of the yi axis must be reversed so that positive values are measured going up, not down. The following image illustrates the two methods:
 |
| Figure 4: Two methods of referencing pixels. |
(Ih / 2 - yi) in the first equation accomplishes the conversion from the computer's method to the celestial sphere method.
Now we can convert from (xi,yi) coordinates to polar coordinates, and from polar coordinates to (xw,yw,zw) coordinates. We have no need to convert to (xi,yi) coordinates so we will not need equations to do this.
The sphere
The equation of a sphere is the following equation:
R2 = (Xw + X1w)2 + (Yw + Y1w)2 + (Zw + Z1w)2
Where (X1w,Y1w,Z1w) is the coordinates for the center of the sphere and (Xw,Yw,Zw) is any point on the edge of the sphere.
Therefore, the following equation would be true for any point inside of the sphere:
R2 > (Xw + X1w)2 + (Yw + Y1w)2 + (Zw + Z1w)2
Now that we have this equation, we can put a sphere anywhere in the 3D world by setting the values of (X1w,Y1w,Z1w) and R. We can also test whether or not any point in the 3D world is inside of that sphere by setting the values of (Xw,Yw,Zw) and testing whether or not the equation is true.
Celestial sphere coordinates
To describe the position of a star, astronomers first measure the declination of the star in degrees, minutes, and seconds. Then they measure the right ascension of the star in hours, minutes and seconds. The right ascention is always positive and is measured in a counter-clockwise direction if you are looking down from the north celestial pole. Since there are 60 seconds in a minute, and 60 minutes in a degree or hour (depending on which system you are using at the moment), the coordinates can be converted to degrees with the following equations.
Converting from Hours, Minutes, and Seconds to Degrees:
Eo = (2 * 180o / 24) * (h + m / 60 + s / 602)
Converting from Degrees, Minutes, and Seconds to Degrees:
Vo = d + m / 60 + s / 602
Magnitudes
The visual magnitude of a star is a measure of how bright it appears to be from earth. The brightest magnitudes are negative numbers and the dimmest magnitudes are the largest numbers. Sirius is the brightest star in the sky and it has a magnitude of about -1.5. The highest magnitude stars that can be seen by the naked eye on a clear night is about 6. The system was invented thousands of years ago and it was recently found out with telescopes that a magnitude 1 star is 100 times brighter than a magnitude 6 star. Therefore each magnitude is about 2.5 times brighter than the next higher magnitude. This is illustrated in the following image:
 |
| Figure 5: Magnitudes. |
The radius of each star can be calculated with the following equations. S is a number used to smooth out the curve and make the radius of each magnitude closer to the last one. M0 is the radius of a star of magnitude 0. V is the visual magnitude of the star that you want the radius of. The second equation is there to emphasize that 2.5 is taken to the power of [(0 - V) * M]. The symbol ^ means "to the power of."
Rv = M0 * 2.5 [(0 - V) * S]
Rv = M0 * 2.5 ^ [(0 - V) * S]
If you set S = 1 / 2, the above graph looks like the following image, which is closer to what is needed for a star chart:
| Figure 5: Magnitudes with S = 0.5. |
The star charter
Before the star chart can be made, the values of the following constants must be set:
M0 the radius for magnitude 0
S the number that the power is multiplied by to get the radius
Ih the height of the image
Mh the highest magnitude of a star allowed on the
chart
Rc the radius of celestial sphere
To make the star chart, a computer program was written that first reads a database of over 9000 stars. As it reads each star, it treats it as a sphere and uses the above equations to convert the positions of the stars (the centers of the spheres) to (Xw,Yw,Zw) coordinates. It also calculates the radius of each sphere.
The star charter program then goes through each pixel on the image, converts the coordinates of the pixel to (Xw,Yw,Zw) coordinates, and tests whether or not the pixel is inside of any of the spheres. If it is, the pixel is colored white; if not, it is left alone.
The result: a star chart with stars that become circles once the image is wrapped around the celestial sphere.
If you do not see frames, click here to go to the frames page.
If you do not want to use frames, click here to go to the non-frames home page
and sitemap.